Looking for Answers?
Browse our articles to find the answers you need
Tutorial: Getting Started with Your Help Center
Step 1: Set Up Categories
- Hover over the Knowledge Base icon
 in the side panel and click Categories.
 - Click + Add New Category at the top left.
- Enter a category name in the field and click Create.
Tip:
Reorder your categories by hovering over one, then clicking the Reorder icon  and dragging it into a new position.
and dragging it into a new position. Step 2: Create Subcategories
- Hover over the category on the left and click the Show More icon
 .
. - Click Add Subcategory.
- Enter a subcategory name in the field and click Save.
Step 3: Create Articles
- Click the Knowledge Base icon in the side panel.
- Click + New Article at the top right.
- Select an article type:
- Informative Article: Introduce features, provide step-by-step instructions, answers FAQs and more.
- Feature Request: Collect feedback from your users regarding features they would like to have. Later you can automatically update these users when the feature is released.
- Known Issue: Users can report that they're experiencing an issue and automatically receive updates when it's resolved.
- (Optional) Select a category for your article from the Category drop-down.
Note: An article must be in a category before you can publish it. You can move it to a category later. - Click Create Article.
- Enter the title of the article in the Title field.
- Click the Add a block icon
 to start adding content:
 - Text: Add text, bulleted or numbered lists.
- Subtitle: Add section headings, subtitles and anchored subtitles.
- Informative Notes: Add a note, tip, important or warning content.
- Lines: Add solid or dashed lines.
- Image: Upload an image.
- Video: Add a video by URL or embed code.
- More: Select other available options including tables, collapsible components, HTML and more.
- From the footer menu you can also select:
- Translations: Send to translation to localize your article in other languages.
- Labels: Add labels to help sort and manage content.
- Notes: Add an internal note. This note is not visible in the published content.
- Tasks: Create and assign Write, Update or Review tasks.
- Related Content: Add related content to help direct your users to other articles.
- Categories: Move the article into another category or subcategory.
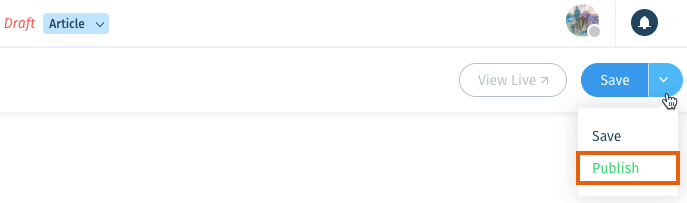
- Click Save at the top right.
- When you're ready, click the Save drop-down and select Publish.
- (Optional) Select a publishing option:
- Notify followers: Send an automatic notification to followers of the article.
- Update URL: Redirect the article's old URL (if previously published with a different title) to the new URL.
- Click Publish my article now.
Was this article helpful?